
 Yahoo Autos
 The Biggest Hair Trend RN? Bubble Braids—Here's How to Create 'Em
"Hearst Magazines and Yahoo may earn commission or revenue on some items through the links below."
Let me guess, you recently stumbled across a photo or two of bubble braids or bubble ponytails and loved them so much that you wanted to learn how to DIY the look. Am I right?! I bet I am. Although the popular hairstyle is not exactly new, it's been all over my social feeds lately, so I wouldn't be surprised if you're seeing the style everywhere and intrigued by it too.
Bubble braids or bubble ponys are a cool way to switch up your usual updo, and they're actually pretty easy to do. Celeb hairstylist Cynthia Alvarez describes the look as “one or more ponytails that are tied with hair ties continuously down the ponytail, with about an inch or two of space in between them.” See? You don't even need to know how to braid with three strands to pull this look off yourself. What you do need, though, are a few tutorials to demonstrate how to create the look on different hair types, textures, and lengths, and recommendations for hair accessories, tools, and products to help you out. We've got all for ya below, so keep reading.
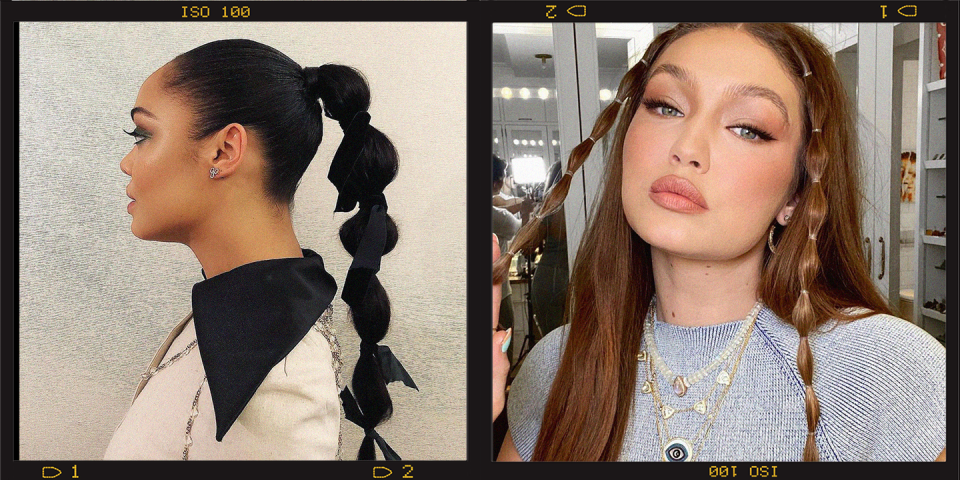
1. A bubble braid on long, thick hair:
Before we get into multiple bubble braids or bubble braids that attach to your head, let's start with the basics. Watch the above video and follow the steps below to learn how to do a single bubble braid or bubble ponytail.
Brush your hair. Use a boar bristle brush to smooth out any knots or tangles.
Make a low ponytail. Pull all of your hair into a low ponytail and secure it with a hair tie. If you don't want the hair ties to be a part of your overall look, use a clear-colored elastic or one that matches the color of your hair. If you want to make more of a statement, Alvarez recommends using small scrunchies (like the Invisibobble Slim Sprunchies) for a fancier look. Either way, keep it consistent all the way down the tail.
Add another hair tie to the tail. About an inch or two down from the base of your pony, wrap the tail with another hair tie to create your first section.
Tug the section. Some prefer to tie all of the rubberbands and then go back and pull apart the sections, but as demonstrated in the video above, you can also pull each section as you move down the tail. Alvarez also suggests the latter and says as you secure each section, spread the hair gently with your fingertips between the two elastics to create that bubble effect.
Continue down the tail. Keep adding hair ties and separating the sections until you've reached the end of the tail.
2. Bubble braids with curls:
With curls, you don't necessarily want to be tugging them through tight elastics and risk getting all tangled or squished. Follow this video to figure out how to get the bubble braid look with curly hair and take notes because it's a little different than the instructions above.
Prep with moisturizing spray. This will not only help moisturize your curls but also work to moisten and smooth down the hair at your roots to create a slick ponytail.
Make a ponytail. Use your hair brush to smooth down any bumps as you brush all of your hair back into a ponytail and secure it with a hair tie.
Prep the tail. Use your favorite curly hair products to define your curls and encourage bounce and volume that will create that bubble shape.
Begin adding elastics to the tail. Before adding each elastic to separate the section, create the bubble shape you want so you don't have to go back and tug on your curls later. A few inches down from the base, pinch the tail with your fingers, and use your other hand to shape the section. Then, wrap an elastic once around the tail but don't tie it tight. Continue this down the tail until you've finished.
3. Bubble-braided ponytail with braiding hair
If you want a quick and easy (not to mention cute) way to add length to your bubble ponytail, this video will show you exactly how.
Prep your hair. Choose your part, then apply your styling products, like a styling gel, in sections.
Secure your hair in a low ponytail. Use a brush to smooth your hair back and secure it tightly in a low ponytail. Do this in sections to get the smoothest finish.
Braid your hair. Braid your ponytail and wrap it into a bun around the base of the ponytail. Secure with a hair tie.
Add your braiding hair. Take your braiding hair of choice and wrap it around the base of your braided bun to cover the hair underneath. Use pins to secure it. Take a 1-inch section of hair from the tail and clip it aside for the final step.
Wrap hair elastics down the ponytail. Every few inches, add another elastic to create the bubble sections. Be sure to stop and detangle the hair as you go.
Cover the base of your ponytail. Grab that section you set aside in step 4, wrap it around the base of your ponytail, and secure it in place with a pin to finish.
4. Bubble braids on short hair:
Not only will you get lots of helpful tips for trying bubble braids on short hair, but you'll also find out how to attach the bubble braids to your head. Watch above to see what I mean.
Section your hair. Split your hair down the middle and complete the left side before starting the right.
Make your first ponytail. Starting from your hairline, gather a 1-inch section (where your bangs would be) and tie it off in a tight ponytail with a small elastic.
Make your next ponytail. Gather a 1-inch section of hair right behind the first ponytail, and before you secure it with a hair tie, add the tail from the first pony to connect the first section with the next.
Continue making ponytails. Continue making ponytails with 1-inch sections of hair back toward your crown, adding the tail to the next ponytail each time. With short hair, the smaller the distance between elastics, the better to prevent the ends from sticking out. If your hair is too short to go all the way down the nape of your neck, try a half-up hairstyle instead.
Pull apart the sections. Once all the elastics are secure, gently tug the sections between each one to create the bubble effect. Again, pieces tend to pop out with short hair so don't pull and mess with it too much.
Set with hairspray. If you do have any flyaways or loose ends, use hairspray to smooth them down.
5. Bubble braids on long, fine hair:
If you want to try high pigtail bubble braids, follow this tutorial to learn how.
Section your hair. When working with pigtails, symmetry is key. Part your hair in the middle all the way down the back.
Secure your pigtails. Starting on one side of your head, use an elastic to tightly secure your first ponytail. To make sure the second ponytail matches the same height and placement as the first, check yourself in the mirror from all angles.
Add your elastics down the tails. If you don't really want your bubbles to be staggered, use a lipstick tube or something as a guide to make sure your sections are all equal in size and perfectly positioned.
Pull apart the sections. After all your hair ties are applied, use your fingers to pull apart the section. As the elastics inch up, pull them down to adjust them, and remember to use your measuring tool as your guide.
Finish with hairspray. If your hair is pretty smooth or slick, hairspray will give it the grit and stickiness it needs to keep everything in place.
6. Bubble braids on straight hair:
In this video, you'll learn how to make small bubble braided tendrils. Wear one on either side of your face, or add a few all over.
Style your hair first. Since you won't be pulling all your hair back into a ponytail, you'll want to curl your hair or style it however you want before getting started. If you have bangs, think about whether you want to leave them out or pull them back.
Tie of a small section of hair. Decide where you want your first tendril, then tie a small elastic close to the root.
Continue adding elastics. Keep going down the tail, adding an elastic every inch or so until you've reached the bottom of the section.
Pull the sections apart. Fine, straight hair tends to fall flat (the opposite of a bubble), so add a little dry shampoo powder between your fingers before pulling apart the sections to give your hair a little grip. If you have trouble poofing the section, hold the elastic at the bottom of the section firmly in one hand as you pull apart the hair above it.
Adjust the elastics. As you pull apart each bubble, your sections below may shrink, so push the elastic bands down to adjust the size of the sections until they're all even.
7. Bubble braids on 4C hair:
This tutorial walks you through all the steps you need to try double bubble braids on 4c hair with braiding hair extensions. Watch and learn, then try it yourself.
Section your hair. Part your hair down the middle and work with one half at a time. Then, create subsections. Starting with the hair by the nape of your neck, loosely section off your hair in ponytails until you have about four total.
Apply your styling products. A combination of a moisturizing spray and styling wax will keep your hair smooth and slick during the styling process. As you apply the products, use a brush to pull your sections tight and secure them with elastics.
Braid your ponytails. This will help you secure the braiding hair in the next step.
Tie a loop around your braiding hair with a hair tie. Take a small section of braiding hair, and place the middle of the section over a hair elastic. Pull the ends of the elastic around and stick one end through the other to tie a loop around the hair. Make two for each side of your head (four total).
Secure the braiding hair to the front braid. Now that your hair is attached to an elastic it, use that to tie the braiding hair to the base of the braided ponytail closest to your hairline.
Secure your second section of braiding hair. You're going to want a visual for this part, so pay special attention when you get to the 8:30 mark in the video. Wrap the hair from the first section to cover the braid underneath, then grab the second section of braiding hair, and incorporate that with the tail of the first. Tie the second section to the second braid (again, refer to the video if you're a visual learner).
Create the bubbles. Continue securing the braiding hair to your braided ponytails and the bubble shape will start to form.
Finish the tail. Keep wrapping the tail with hair ties all the way down to end.
Repeat on the other side of your head.
You Might Also Like
