
 Yahoo Autos
 Project Car Diaries: Fixing Annoying LCD Scratches by Fabricating a New Part

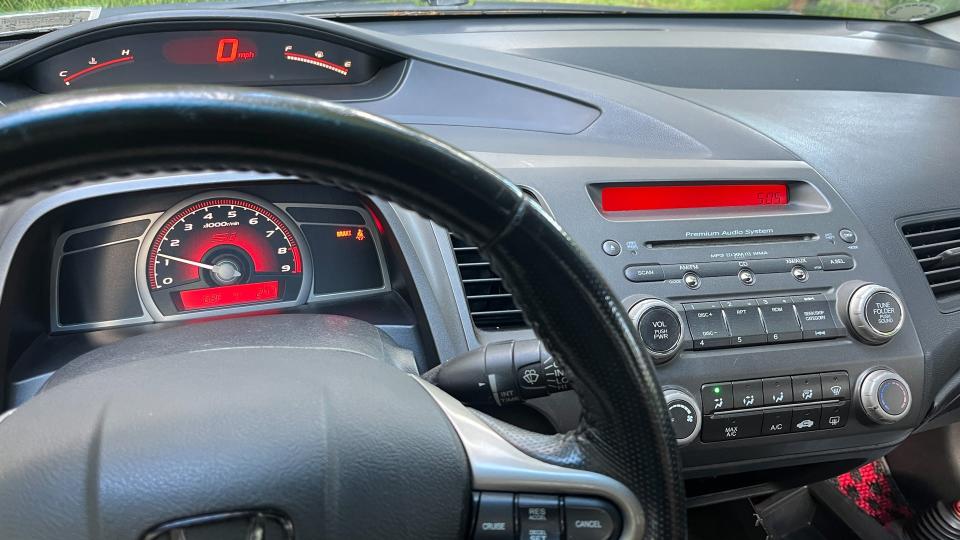
Many cars on the road today, especially models from the '00s decade, have little LCD displays to indicate content like the time or a radio station. I'm already nostalgic for that near-past era of car cockpit design, so my eye's always drawn to the LCD screen in my 2006 Honda Civic. It was all scratched up and I was afraid I'd further damage it trying to clean it, so I decided to just replace it. But first I had to fabricate the new part.

I understand that most people driving older cars would probably rather swap in a modern smartphone-style head unit than update or repair a dated factory radio.
But some of us tragically obsessed car nerds are not "most people." This is how I ended up reverse-engineering a simple piece of a factory Honda part, and then having my own creation custom-fabricated to replicate it. All to save a few hundred bucks and keep the radio of my old Civic looking stock.
I don't want to distract you with a hot take here, but I don't like modern display screens in cars. Getting a non-navigation radio was a big requirement for me when I was shopping for an eighth-gen Civic. I love the clean and simple look of this car's stock radio—it's so much easier to engage with the joy of driving when you don't have the distractions of the internet and a bombardment of notifications on your dashboard.
Saving a Stock Stereo Screen
Unfortunately, at some point in my Civic's life, somebody used an ill-advised interior cleaning technique, scuffing the hell out of the radio's LCD screen and leaving weird spots on the plastic. It was probably a using cleaner that had ammonia and a harsh paper towel—always, at a minimum, only use car-interior-specific products to clean car interiors. Many interior elements are sensitive and can be uglified by the wrong cleaners.


My options from there were: Ignore it (most popular), try to clean and buff the screen, replace the whole radio head unit with a used one (which might also be damaged), or replace the radio with a brand-new one (expensive, if even possible to find).
Meanwhile, the radio's backlighting died, which was the motivation I needed to actually take it apart. I learned that these Civic radios don't have easily replaceable bulbs for button backlighting, but rather LEDs on a circuit board that would need soldering to reconnect. Somebody uploaded a tutorial to YouTube, but it doesn't actually show the repair very clearly so I wasn't confident in my ability to replicate it.

"I'll just grab another radio then," I figured. After a week or two trawling listings (Si-specific radios, with red lighting, are a little tougher to find than the standard blue-lit ones) I had an allegedly working unit to try.
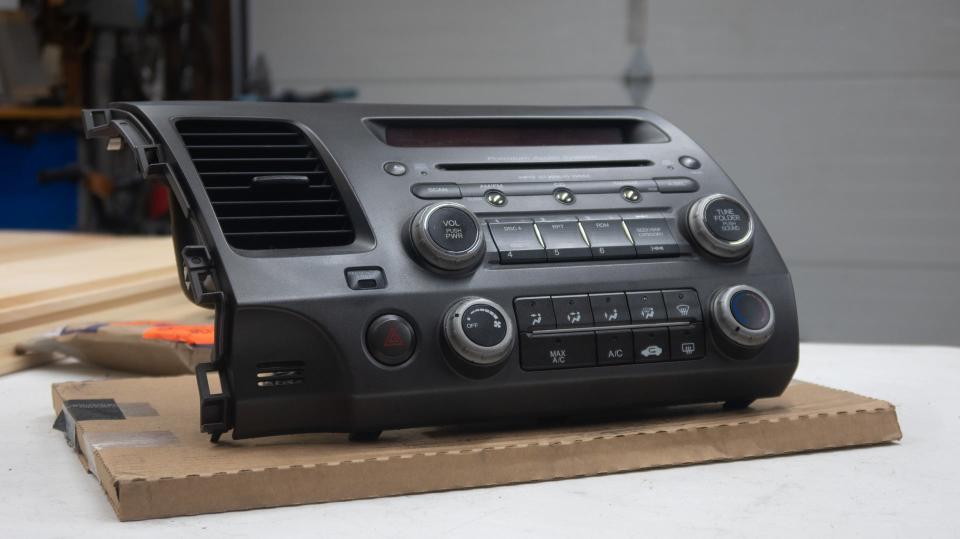
The LCD on my new-used radio was definitely nicer than my outgoing one, but it still had a few pretty deep scratches that I wasn't stoked about. As I was fiddling with the old radio, now out of the car, I realized that the heavily scratched clear screen was its own piece, not a fused part of the lit LCD display itself as I'd previously assumed. It was a mild eureka moment; I instantly determined I should just replace the clear plastic with a fresh, unmarred piece.

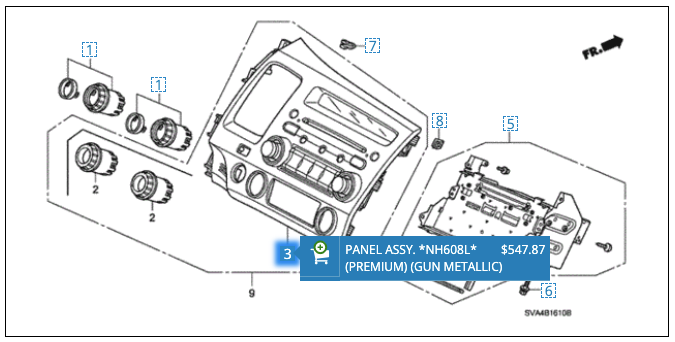
My first thought was to find the part number and just see if any of my usual parts suppliers could get me one. But it turned out it didn't have its own number—the clear slit was simply considered a part of a part, namely the radio faceplate which lists at a hefty $550. That didn't turn out to matter, though. The clear piece popped out its mount with minimal finger force, and better yet, it was a very simple shape.
"Let's just make a new little piece of plastic," I told Bramble the dog, who was supervising my work as usual.
It's possible that you could find some clear acrylic, plastic, or plexiglass at a hardware or craft store. Cutting those could be done at home too, with the right tools and a steady hand. But I found a fabrication solution I like much better: the online custom laser-cutting outfit SendCutSend.
This company basically takes 3D designs and turns them into physical items made from a big range of materials (metals, plastics, and other stuff), and can do so in small quantities. Full disclosure: We do have a sponsored post with these guys in the works. But as an enthusiast of shadetree engineering, I love the fact that such a website exists to entertain my fabrication fantasies.
Making the Part
SendCutSend's website includes a feature called the Parts Builder that lets you design your own 3D items in your browser and then have them shipped to you in a range of materials. At the time of this writing, the design capabilities are not exactly infinite. You have to build off an existing template and any angular bending is difficult. But for a simple shape like a thin 3D rectangle? That was well within this version of Parts Builder's capabilities.


I measured the dimensions of the Honda LCD screen, including the corner radius of the rounded edges, and just entered those specs into the shape I was designing on the computer. Clear acrylic was a material option, my only concern was with thickness. While the Honda screen is almost paper-thin, the thinnest acrylic I could order would be 3.0 mm.
Luckily for me, when the item arrived and I freed it from its protective packaging, it fit into the dashboard slot perfectly and was just thin enough to let the stereo circuitry sit where it needed to.


While I had the radio out, I slapped in a Bluetooth streaming module so I could listen to Spotify without my old-school cig-lighter radio transmitter dongle. These modules are broadly available for a big range of mid-2000s cars, stuff that was new enough to have had an auxiliary input or CD changer but too old to be able to stream music over Bluetooth. I copped one from eBay for cheap and the sound quality isn't good but it's acceptable to me for now. It might be worth trying a more expensive one if you want the best possible sound with such a setup, though.

With the stereo re-installed, I was thrilled to see how new and fresh my new LCD screen made the cockpit look ... and bummed to discover that my replacement head unit's button backlighting was also burned out. Either that or some wiring's messed up elsewhere, so now that's a quest for another day.
Extra Details
Finally, I got the new-old radio's unlocking code from my local Honda dealer, which I then had to write down for the next time my battery's disconnected. A scribble on the back of an old receipt would have done the trick, but because I'm extra, I made a factory-looking data plate sticker listing the radio's unlocking code and serial number.

Will anyone ever see this besides me? Well, you. Otherwise—no. But it brings me joy.
Can You Fix a Scratched Screen Without Removing It?
In the past, I've always been too nervous to wipe or aggressively treat icky gauge lenses. I always fear I'll just make it worse. These clear plastics are indeed sensitive, but you might be able to clear up scratches with commercially available products.
A few friends of mine have recommended Novus, an acrylic treatment product with three stages for various levels of scratch depth. There's also a cleaning product called Plexus I've heard suggested, and some people claim to have had good luck with headlight restoration kits on old clear plastic as well. I may try these on the old unit when I get some more time, for now I'm happy with my replacement piece.
Normally cleaning products tell you to "test on an inconspicuous area before using," but that would be tough to do with a tiny LCD screen. If you're considering trying to treat some scratches but it's not practical for you to replace the lens as I did, and you're paranoid like I was, my advice would be to try and find a junkyard lens to practice cleaning on before attacking any screens inside your car.
Nostalgic for Pre-Infotainment Interiors Yet?
I'm not going to claim I always completely unplug when I buzz around in this car. My stereo is streaming Spotify via Bluetooth now, after all. But after spending so much time in life with screens, and alerts, and social tagging, and just the general onslaught of information that comes with every minute at work and most minutes after hours life ... I have come to relish any refuges I can get from connectivity and the obligations it entails. And driving a sporty, screen-free, car is one of the best such refuges. So I'm glad this little fabrication experiment worked out.
